
Elegant cat Neon sign
Standard Color / 10.63in x15.75in/ 27 x 40CM
$142.13 USD
Sale price
$142.13 USD
Regular price
$240.16 USD
Skip to product information


Elegant cat Neon sign
$142.13 USD
Sale price
$142.13 USD
Regular price
$240.16 USD
Product type : LED Neon Sign
Operate Voltage : 12V
Light Source : LED Chip
Base Board : Transparent Acrylic
Plug : US / UK/ AU/ EU
Mounting Way : Wall mounting / Hang on
Power Supply : Yes
Adapter : Yes
Guaranteed safe and secure checkout via

DESCRIPTION
CONFIGURATION
Product type : LED Neon Sign
Operate Voltage : 12V
Light Source : LED Chip
Neon Color : Multi-color
Base Board : Transparent Acrylic
Plug : US / UK/ AU/ EU
Mounting Way : Wall mounting / Hang on
Warranty : 2 years
Power Supply : Yes
Adapter : Yes
SHIPPING & RETURNS
Three shipping options are available, confirmable at checkout:
- Free Shipping: 7 - 12 business days
- Rush Order: 4 - 8 business days (Contact us before ordering for confirmation)
We offer global delivery right to your door.
Plus, any transit damage gets a free replacement—no extra cost, no hassle.
INSTALLATION GUIDE
Neonzing LED Neon Light Installation Guide
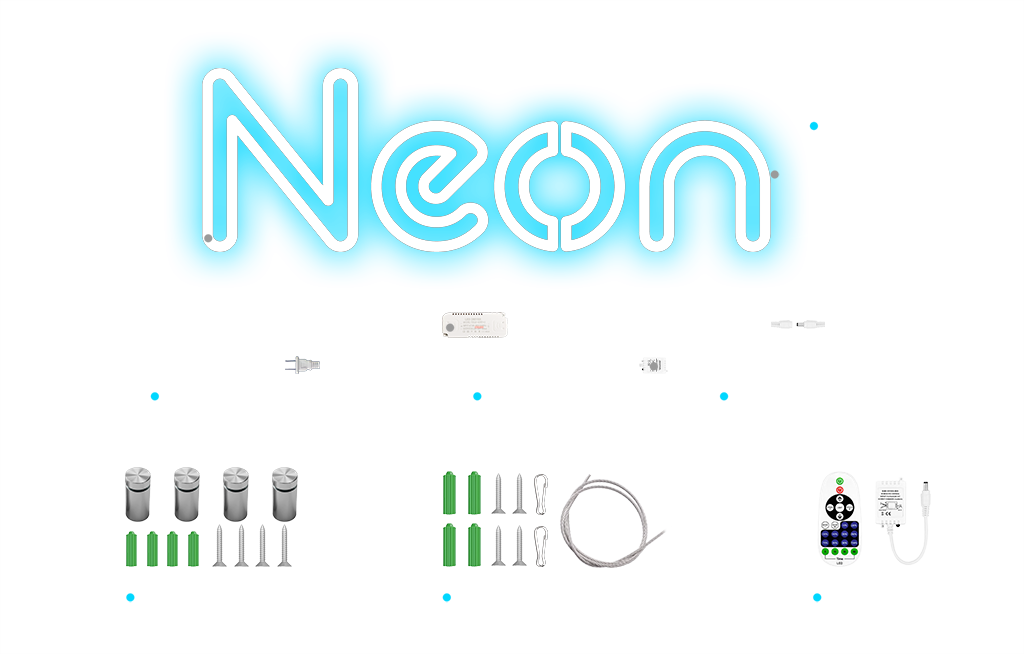
When you purchase custom LED neon lights from Neonzing, we offer you three convenient installation methods: installation with mini screws, installation with stand-off screws, and installation with suspension wires. Mini screws and stand-off screws are provided by default. If you have special requirements, you can contact us at any time. The following are the detailed installation steps:
I. Installation Method with Mini Screws
This method is suitable for neon lights equipped with a cut acrylic backing plate. It's simple to operate and can be easily completed:
1. Positioning and Marking: Place the neon light flat against the installation wall, avoiding scratches. Use a marker pen to mark the positions of the pre-drilled holes.
2. Drilling Preparation: Move the neon light aside and use an electric drill with a suitable small drill bit to create pilot holes at the marked positions.
3. Fixing and Installation: Place the black (or gold/silver) rubber washers over the holes, align the neon light with the pilot holes, and screw in the small silver screws for fixation.
4. Detail Completion: After all the screws are fixed, install the small silver end caps. Finally, connect the transformer and plug it into the power source to light up the neon light.
II. Installation Method with Stand-off Screws
This method is suitable for installations on flat surfaces such as walls, providing a stable and aesthetically pleasing result:
1. Precise Positioning: Place the neon light flat against the wall, align the position, and then mark the pre-drilled holes.
2. Drilling Operation: Place the neon light properly to prevent scratches and create pilot holes.
3. Base Fixing: Unscrew the mounting pins, align the hollow bases with the pilot holes, and insert the small screws for fixation.
4. Sign Fixing: Align the neon light with the bases and fasten it firmly with wide screws to ensure stability.
5. Power-on Test: Connect the transformer and turn on the power to check if the neon light lights up normally.
III. Installation Method with Suspension Wires
This method is suitable for creative hanging needs, creating a unique visual effect:
1. Measurement and Marking: Measure the spacing between the pre-drilled holes on the backing plate of the neon light and mark the positions of the silver vertical mounts on the ceiling.
2. Fixing and Installation: Mark the screw hole positions of the mounts, drill holes, and then fix the mounts with screws.
3. Wire Handling: Cut the suspension wires according to the required length, leaving extra length for making loops.
4. Connection and Hanging: Insert the wires into the clamping mouths of the mounts. Pass one end of each wire through a silver crimp terminal and the hole on the backing plate, then pass it back through the other hole of the crimp terminal and fix it by pressing the crimp terminal with pliers.
5. Installation Completion: Connect the transformer and turn on the power to enjoy the moment when the neon light is lit up.
If you encounter any problems during the installation process, you are welcome to contact us at any time through [your contact information]. The professional team of Neonzing will provide you with considerate support!
MATERIALS
Material Description
Neonzing's neon signs are meticulously crafted using advanced neon flexible materials - LED lights are embedded in PVC or silicone pipes and fixed on recycled acrylic boards. This innovative combination of materials not only perfectly replicates the bright and vivid glow of traditional neon lights but also significantly enhances the durability of the products while maintaining an affordable price. Compared with the materials used by other merchants on platforms such as Amazon and Etsy, Neonzing's material selection and craftsmanship have obvious advantages and superior quality.
We always adhere to the concept of sustainable development:
- Energy - efficient: Neonzing's LED lights consume only one - sixth of the energy of traditional bulbs and have a lifespan of up to 100,000 hours. They are both cost - effective and environmentally friendly.
- Recycling: All our products are made of recycled materials, which helps reduce resource waste and contribute to environmental protection.
- Green packaging: Our packaging materials are 100% recycled, eliminating unnecessary plastics and further reducing the impact on the environment.
Neonzing represents the cutting - edge technology in the neon sign industry. All our products fully comply with international standards such as FCC, UL, and California Proposition 65 (Prop 65). Choosing Neonzing means that you are not only purchasing a market - leading product with excellent quality and reliability but also supporting a green choice that strictly adheres to global environmental and regulatory standards.
Elegant cat Neon sign

Safety & Energy Saving

Easy to Install

Full Control with Remote


Related Products


